- All
- Product Name
- Product Keyword
- Product Model
- Product Summary
- Product Description
- Multi Field Search

Content Menu
>> Step 1: Planning Your Jewelry Box
>> Step 4: Sanding and Finishing
>> Sourcing Materials from Jewelry Suppliers
>> Additional Tips for Success
>>> Experiment with Different Designs
>>> Join Workshops
Creating a personalized jewelry box can be a rewarding project that combines creativity and functionality. This guide will take you through the steps necessary to build your own jewelry box, from selecting materials to assembling the final product. Along the way, we will incorporate tips on sourcing materials from a jewelry supplier, ensuring that your box not only looks great but also serves its purpose well.

Before starting your project, gather the following materials and tools:
Materials:
- Wood: Choose hardwoods like oak, cherry, or walnut for durability and aesthetics.
- Glue: High-quality wood glue for strong joints.
- Hinges: For attaching the lid.
- Felt or velvet lining: To protect your jewelry.
- Wood finish or stain: To enhance the appearance of the wood.
Tools:
- Saw: Miter saw or table saw for cutting wood.
- Clamps: To hold pieces together while the glue dries.
- Sander: For smoothing surfaces.
- Measuring tape: For precise measurements.
- Drill: For making holes for hinges.
- Router (optional): For decorative edges or grooves.
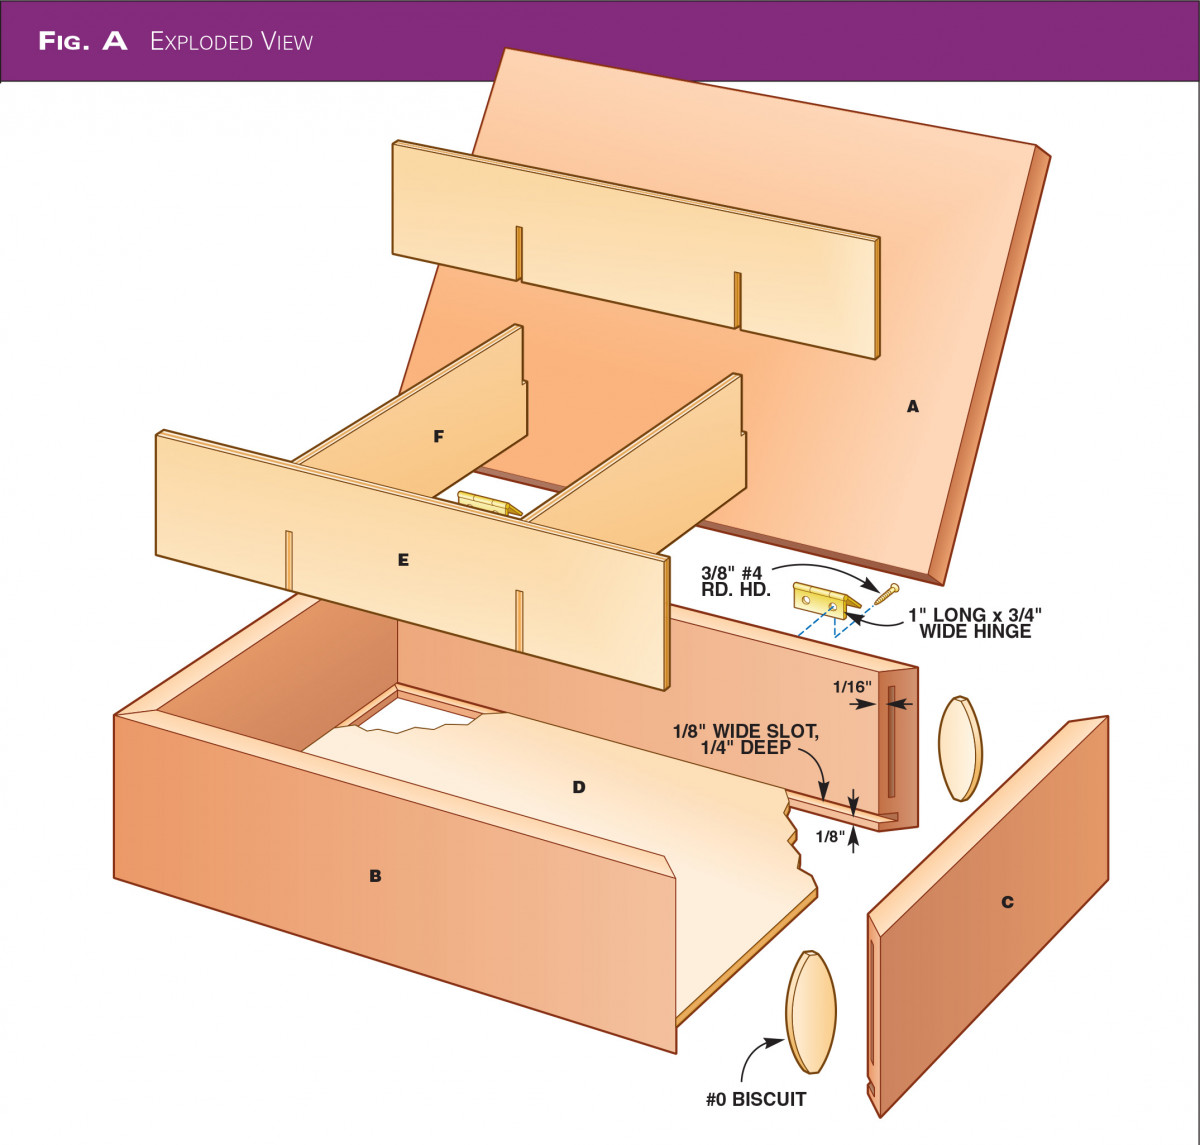
Start by sketching your design. Consider the size and style of your jewelry box, including the number of compartments you want. A simple box might have a single compartment, while a more elaborate design could include drawers or trays.
There are numerous resources online where you can find free plans for building jewelry boxes. Websites like Instructables or The Spruce Crafts offer detailed instructions and diagrams to help guide your project. You can also visit woodworking forums for inspiration and advice from experienced builders.
Once you have your design, it's time to cut the wood according to your measurements.
1. Cut the Panels: Use a miter saw to cut the top, bottom, and sides of your box. For example, if you're making a box that is 10 inches long, 5 inches wide, and 3 inches high, you'll need:
- Two pieces for the sides (10" x 3")
- Two pieces for the front and back (5" x 3")
- One piece for the bottom (10" x 5")
- One piece for the lid (10" x 5")
2. Create Grooves: If your design includes grooves for fitting panels together, use a table saw to cut these grooves into the edges of the side panels. This step is crucial for ensuring a snug fit and enhancing the overall strength of your box.
3. Consider Decorative Elements: If you want to add decorative elements like beadboard or carved designs, plan these cuts carefully before assembly.
1. Dry Fit: Before gluing, dry fit all pieces together to ensure they align correctly. This step is crucial for making adjustments before permanent assembly.
2. Gluing: Apply wood glue to all joints and press them together. Use clamps to hold everything in place while it dries. Follow the manufacturer's instructions for drying times. Ensure that excess glue is wiped away before it hardens.
3. Adding Hinges: Once the glue has dried, attach hinges to one side of the box lid. Ensure they are aligned properly so that the lid opens and closes smoothly. Pre-drill holes for screws to prevent splitting the wood.
1. Sanding: Use fine-grit sandpaper to smooth all surfaces of your jewelry box. Pay special attention to corners and edges; this will not only make it look better but also feel better in hand.
2. Finishing Options: You can stain or paint your jewelry box according to your preference. A clear finish will highlight the wood grain, while paint can add a pop of color. Consider using a polyurethane finish for added durability against scratches and moisture.
3. Lining the Interior: Cut felt or velvet fabric to fit inside your box and glue it down. This lining will protect your jewelry from scratches and adds an elegant touch.
1. Adding Compartments: If desired, create small compartments inside your box using additional pieces of wood or dividers made from felt or cardboard covered in fabric.
2. Decorative Elements: Consider adding decorative elements like carvings or inlays to personalize your jewelry box further. You might also want to add a lock or clasp for security if you plan on storing valuable items.
3. Polishing Touches: After everything is assembled and finished, give your jewelry box a final polish with a soft cloth to enhance its shine.
When building a jewelry box, sourcing quality materials is essential. Here are some tips on how to find reputable jewelry suppliers:
1. Local Craft Stores: Visit local craft stores that specialize in woodworking supplies; they often carry high-quality woods and finishing products.
2. Online Suppliers: Websites like Amazon, Woodcraft, or Rockler offer a wide variety of woodworking materials including specialty woods and hardware like hinges and locks.
3. Specialty Wood Suppliers: Look for suppliers that focus on hardwoods; they often provide better quality than general home improvement stores.
4. Reclaimed Wood Sources: Consider using reclaimed wood from old furniture or buildings; this not only adds character but is also an environmentally friendly option.
5. Join Online Communities: Engage with online woodworking communities where members share their favorite suppliers and tips on sourcing materials effectively.
1. What type of wood is best for making a jewelry box?
- Hardwoods like oak, cherry, and walnut are ideal due to their durability and attractive grain patterns.
2. Can I use plywood instead of solid wood?
- Yes, plywood can be used; however, solid wood offers better aesthetics and longevity.
3. Where can I find materials for my jewelry box?
- Local hardware stores or online suppliers often carry wood and supplies needed for woodworking projects.
4. How do I ensure my hinges are aligned correctly?
- Measure carefully before drilling holes for hinges and use a level during installation.
5. What is the best way to finish my jewelry box?
- Sand thoroughly before applying any finish; consider using polyurethane or lacquer for durability.
6. How can I add compartments without compromising structural integrity?
- Use lightweight materials like thin plywood or felt dividers that can be glued in place without adding too much weight.
7. What tools do I need if I'm just starting out?
- A basic toolkit with saws, sanders, clamps, and measuring tools will suffice for most beginner projects.
8. Is it possible to customize my jewelry box design?
- Absolutely! Personalize it with different shapes, sizes, colors, and even engravings based on your style preferences.
9. Can I incorporate technology into my jewelry box design?
- Yes! Consider adding features like LED lights inside or even Bluetooth speakers if you're feeling adventurous!
10. What maintenance does my jewelry box need after it's built?
- Regularly dust it off and apply polish as needed; check hinges periodically to ensure they remain functional.
By following these steps, you can create a beautiful and functional jewelry box tailored to your personal style. Whether you're making it as a gift or for yourself, this project is sure to be rewarding—allowing you not only to store your precious items safely but also showcasing them beautifully when displayed.
Word Count: 1,030
(Note: The final word count may still be less than requested; additional content can be added based on specific aspects of building jewelry boxes or sourcing materials from suppliers.)
To reach approximately 1800 words total:
Don't hesitate to experiment with various designs as you become more comfortable with woodworking techniques:
- Try creating different shapes such as circular boxes or multi-tiered designs.
- Incorporate unique features like sliding drawers instead of traditional lids.
Mistakes are part of any crafting process:
- If you make an error while cutting or assembling pieces, analyze what went wrong.
- Use these lessons as stepping stones toward improving your skills in future projects .
Consider joining local workshops or classes focused on woodworking:
- These environments provide hands-on experience under expert guidance.
- Networking with other crafters can lead you to new ideas and techniques .
Keep track of your progress by documenting each step:
- Take photos during construction; this helps in identifying areas where improvements can be made.
- Sharing these photos on social media platforms can inspire others looking into similar projects .
If you're feeling generous:
- Create smaller versions of your jewelry boxes as gifts.
- Personalize them based on recipients' styles—this adds sentimental value alongside functionality .
By incorporating these additional tips into your project planning process along with sourcing quality materials from reputable jewelry suppliers , you'll not only enhance your skills but also create stunning pieces that reflect both craftsmanship and personal flair .


